

To Create A Windows To Go Workspace On A Usb Drive, Which Minimum Size Usb Drive Is Required?
Windows To Go is a complete Windows operating system on a USB flash drive (or an external USB hard drive) that you can take it with you anywhere you desire, plug information technology into any computer and apply it just similar you utilise your own desktop or laptop in your part or home. You don't fifty-fifty demand whatsoever network connectivity for booting into your Windows To Get. Imagine visiting your friend and instead of using her reckoner that is loaded with junk software by the manufacturer (no they don't dislike your friend, they go paid for installing junk software on her new computer), you whip out your Windows To Go flash drive and while you whistle your favorite song you plug your flash drive and boot into your Windows To Go. She looks at your stunning desktop background and your fancy apps and go "Wow! man, you lot're cool." and y'all give her a wicked smile and say "Yeah! I get that a lot."
Windows To Get is a essentially a complete computer in a pocket. All the useful features and technologies in Windows viii.1 Enterprise that are available to businesses on desktop computers are also available in Windows To Become. These include Group Policy, BitLocker, BranchCache, AppLocker, App-V, UE-5, and DirectAccess. This is great because you can secure your Windows To Go drive with BitLocker To Go which will encrypt your USB drive.
Are We Express to Using Merely Certified USB three.0 Drives?
The brusque answer is no. When Windows To Get was commencement released a few years ago y'all had to use only USB 3.0 drives certified by Microsoft for Windows To Go and back then there were only iii drives. Afterward Microsoft tested and certified additional drives from various vendors. These drives are tested by Microsoft to work efficiently and are basically optimized for Windows To Go. These expensive drives are great for businesses but you are no longer limited to these expensive drives. Luckily you tin can use pretty much whatever USB 3.0 bulldoze to install Windows To Go, fifty-fifty if information technology is non tested and certified past Microsoft. The USB drives that are certified by Microsoft are all 32GB or larger only y'all can utilise USB 3.0 flash drives that are much smaller, e.1000. 16GB, although Microsoft recommends a minimum size of 20GB. Obviously larger drives will let yous to install more applications and utilities.
Here are the USB iii.0 drives that are certified by Microsoft at the fourth dimension I am writing this commodity (December 6, 2014).
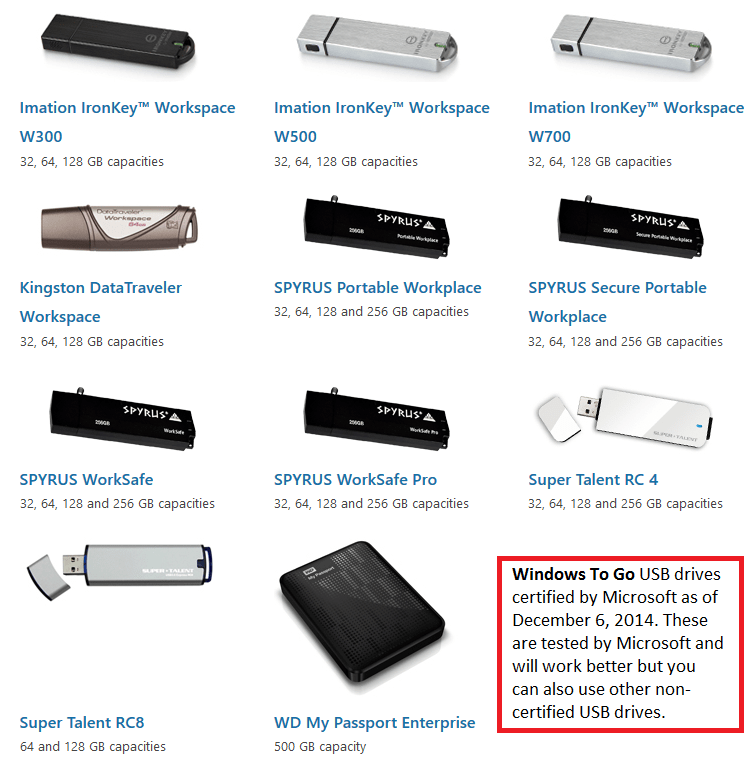
These drives are outrageously expensive. For example, the Kingston USB three.0 drives tin price yous anywhere from $86.99 for 32GB to $259.99 for 128GB. Compare these to the competitors who sell brand proper name 32GB USB three.0 drives for less than $20 and even the 128GB USB 3.0 drives tin be purchased for less than $35. By the style, these are today'due south prices. That is non to say that these expensive drives are not good. Manifestly, they are of higher quality and perhaps even better warranty simply at the end of the solar day they are simply USB flash drives and storing important data on Windows To Go drives, or on whatsoever flash drive, is not recommended. Having said all this, if you want to salve money and spend time experimenting with non-certified USB drives that'south your prerogative. Even so, if you don't have too much time on your hand and are willing to pay more then I recommend using a certified Windows To Get drive.
Windows To Go Host Arrangement Requirements
According to Microsoft, the following are the minimal requirements necessary to run Windows To Go on a host computer.
- 1 GHz or faster processor.
- 2 GB RAM or more.
- USB boot enabled. PCs certified for use with Windows vii or later on can exist configured to boot straight from USB.
- Must support the image on the Windows To Go drive.
- USB hubs are non supported. You must connect the Windows To Go drive directly to the host machine.
- DirectX 9 graphics device that has a Windows Display Driver Model (WDDM) one.ii or later version driver.
- USB two.0 port or greater.
In this commodity I will bear witness you how to install Windows 8 Enterprise on a Windows To Go 32GB USB 3.0 drive manufactured past Transcend that is not certified by Microsoft. Frankly, the entire process is fairly simple. The amount of fourth dimension that will have you type all the commands is mayhap less than 5 minutes. Nigh of the time is spent waiting for the paradigm to be deployed to the USB drive so letting Windows To Go configure Windows 8 for first use. If yous but go run your errands and come back while the image is being deployed you lot will experience you inappreciably did any work to create the Windows To Go drive. I volition share 2 different options for creating Windows To Go bulldoze. Ane is manual and the other is using Windows To Get Creator wizard.
Notation: I tried installing Windows 8.i using the Windows To Go Creator as well as the transmission method merely couldn't go information technology to work. I so used Windows 8 with Windows to Get Creator and it worked flawlessly. I didn't endeavour Windows viii using the manual method but there are lots of people who take tried that and it works.
Assumptions
For the purpose of this article, hither are some of the assumptions I am making.
- The operating organization on my desktop computer is Windows 8.1 Pro.
- I am using a 32GB non-certified USB 3.0 drive manufactured past Transcend. "Non-certified" merely means it has not been tested or approved by Microsoft and therefore Microsoft can't guarantee that it will work.
- I will install Windows eight.i Enterprise on my USB 3.0 bulldoze.
- The drive letter One thousand: represents the USB drive on my calculator.
- the drive letter L: represents the drive letter where my Windows 8.one ISO file is mounted.
In that location are a couple of ways to create the Windows To Get drive. I will cover both of these options in this article.
Pick 1 – Install Windows To Go Using "Windows To Go Creator" Wizard
Choice ii – Install Windows To Go Using the Manual Method
I recommend the first method considering information technology is as simple as specifying where the install.wim file is located and the wizard does the formatting, makes the drive bootable and everything else. With this method yous volition barely spend a infinitesimal to enter the information. The second method will take a bit longer and it may take you lot up to iv or 5 minutes to enter the information. Most of the time, with both methods, is spent waiting for the prototype to be deployed and so waiting for Windows To Go drive to be configured for the commencement time, which involves a couple of automatic reboots. The following estimated times are based on my computer. Your timing may vary.
Estimated fourth dimension for image deployment = ninety minutes
Estimated time for initial Windows 8 configuration = 25 minutes
Choice 1 – Install Windows To Go Using "Windows To Go Creator" Wizard
- Download and install the AOMEI Sectionalization Banana Standard, which is free, from http://www.disk-partition.com/download.html. We will use the program's wizard to create the Windows To Go drive.
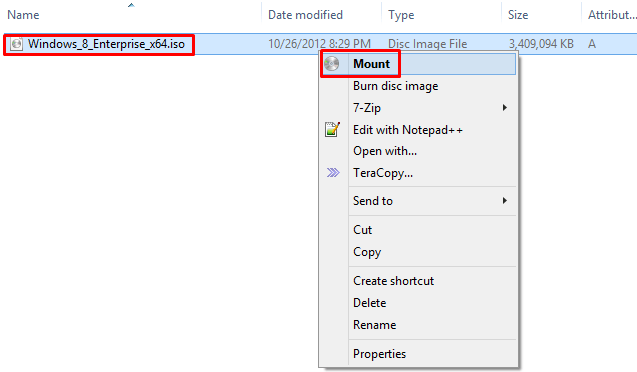
- Locate your Windows 8 Enterprise ISO file, right-click and select Mount. By mounting the ISO file we have a new drive alphabetic character in Windows File Manager and it substantially looks and acts exactly equally if y'all have inserted a DVD in a DVD ROM drive. In my case the organisation assigned a bulldoze letter L. If the ISO file is on some other calculator y'all will not be able to use information technology. Just re-create the file from some other computer to the local host computer where you are performing these steps.
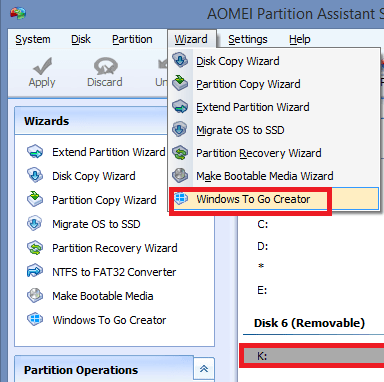
- Get-go the AOMEI Partition Assistant that you installed in Pace i above and on the primary card select Sorcerer, Windows To Go Creator.
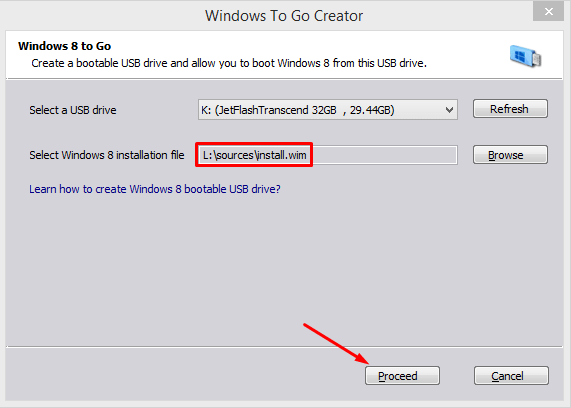
- Your USB drive should already be selected. Click Browse and add together the Windows 8 installation file. Yous can either bespeak to the ISO file or do what I did, indicate to the install.wim file in the sources binder. In my case the path is L:\sources\install.wim. Click Proceed to start the deployment.
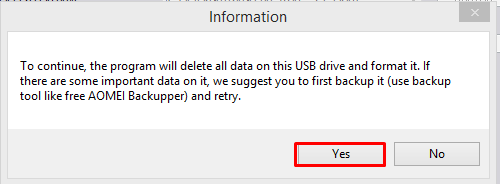
- Yous will see the following warning that your USB bulldoze volition exist formatted and that you should back up your data if necessary. Click Yes to proceed.
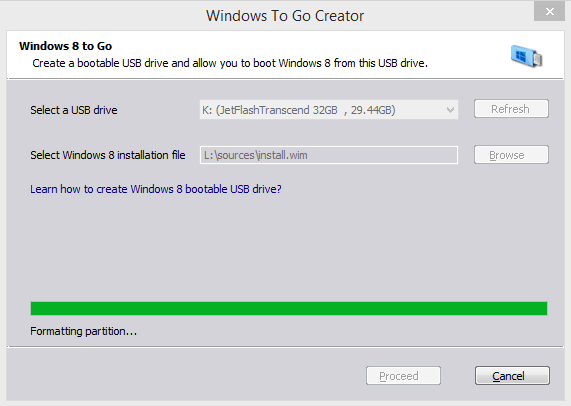
- Your USB drive will be formatted and the program will start deploying the image. This may take up to ninety minutes. You lot volition see the time remaining on the screen so now will be a skilful fourth dimension to take a break.
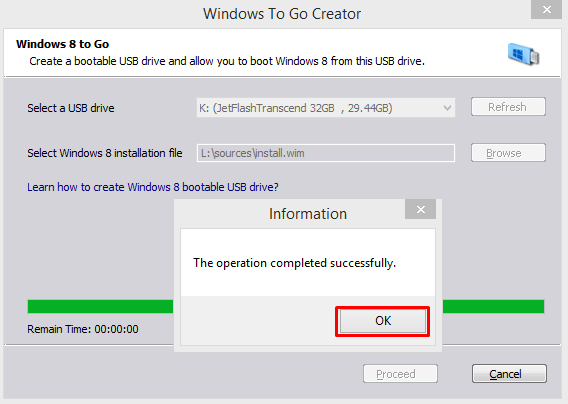
- After the deployment is complete yous will run into the prompt that the operation completed successfully. Click OK.
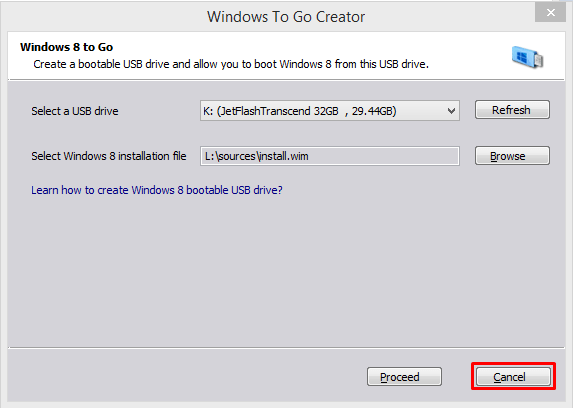
- This side by side screen is not what I was expecting. I was expecting a Terminate push merely I taken to the same screen that y'all come across in Stride 3 above. I clicked on Proceed but I got the warning that my USB drive will be formatted. What? I but deployed the image, I don't desire to format information technology again. That fabricated no sense. I opened a File Explorer Window and went to the 50: drive and noticed it has all the Windows 8 files. Well, my mama raised no dummies. I figured I improve hitting Cancel because my deployment is complete. I was right. I am not certain if in that location is a bug in the software or something else went incorrect merely but be careful otherwise you can end up in a loop. Alert! If y'all finish up seeing the following screen and clicking Proceed brings up the prompt to format the drive like you saw in Step 4, but click Cancel and exit the Partitioning Assistant software. Your epitome is deployed and you are ready to configure your new Windows To Go bulldoze.
Getting Windows To Become Workspace Gear up for First Utilize
Microsoft refers to the Windows To Become drive running Windows viii as Windows To Get Workspace. To get information technology ready for first use follow these instructions.
- Make sure your estimator supports booting from a USB drive and if does, you lot need to ensure that the BIOS is configured to kicking from a USB drive.
- To configure Windows To Get, turn off your host computer and then kick off your Windows To Go drive. I configured Windows To Continue my laptop because I had also many applications open on my desktop computer and didn't really desire to reboot my host computer. I turned off the laptop, inserted my Windows To Get drive, and and so restarted the arrangement. Information technology went through the configuration options and rebooted once or twice. I was working on other things at that time so didn't play close attention. Information technology was just like installing Windows 8 on any other computer. After about 25 minutes I saw the screen to accept the license terms. This is the first time that yous demand to interact with the system. Hither are the steps that you volition take.
- Have the license terms.
- Personalize the color scheme and proper name the PC.
- Select a wireless network or connect to a wireless network afterwards.
- Enter the wireless network password if y'all opted to connect to it now.
- Select Limited or Customize settings. As a best practice always use custom settings.
- Enter an business relationship name and password.
Don't forget to encrypt your drive with BitLocker if you desire to secure information on your Windows To Go drive. I strongly recommend that yous use BitLocker to encrypt your bulldoze.
Selection two – Install Windows To Get Using the Manual Method
Every bit I mentioned earlier, I have a Transcend 32GB USB three.0 drive. Nosotros will set this drive to make sure everything goes smoothly. If this drive was in use before, copy the data to another drive because we will wipe this drive make clean.
- On your Windows 8 host estimator first the Command Prompt with Authoritative credentials.
- You will use the built-in DISKPART utility in Windows 8 to configure the USB 3.0 drive. Earlier you lot offset using the DISKPART utility here is a warning and a few comments that y'all volition discover helpful as you work with the commands. Warning! It is important that you select the correct disk number afterwards you lot use the command List Disk. Because in our case disk v is the USB drive (it's a 32GB drive only it shows 29GB because information technology was formatted with NTFS in the past). In the next step we need to make sure that we utilize select deejay 5 because we will format deejay 5. COMMENTS:
– The clean control is used to remove all data, formatting, and initialization information from the drive.
– The quick at the end of format command saves us fourth dimension because the bulldoze had been formatted in the past and in that location is no need to do a complete format.
– When we mark the partition active we ensure that we tin can kick off of this agile partition.
– I am going to use the Windows 8.i Enterprise ISO file. Re-create it on my Windows viii Pro computer and then Mountain it as a drive.
– You don't have to switch to the USB bulldoze but in this case I volition switch to the K: drive and so run the DISKPART.Let'south go started with the DISKPART utility. Y'all can use either the screenshot or the commands listed below in green. The commands are not case-sensitive.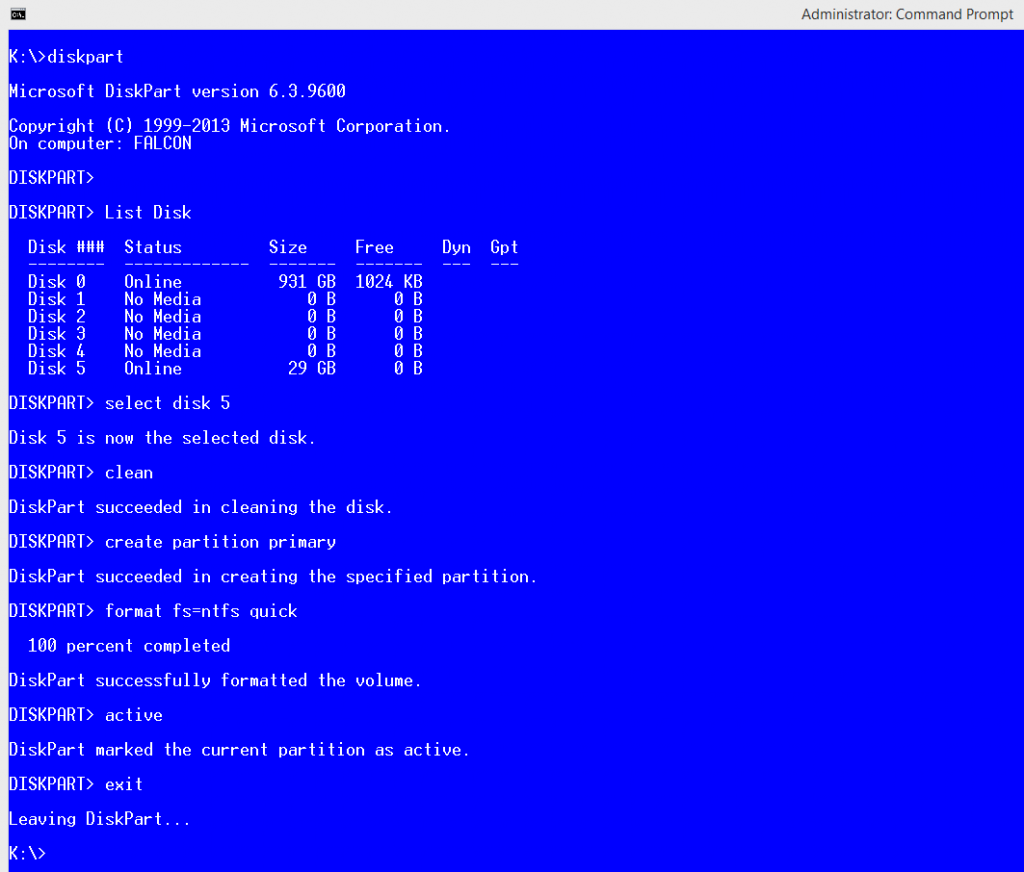 K:\>diskpartMicrosoft DiskPart version 6.iii.9600Copyright (C) 1999-2013 Microsoft Corporation.
On computer: WINDOWS8 DISKPART> Listing Disk Disk ### Status Size Costless Dyn Gpt
——– ————- ——- ——- — —
Deejay 0 Online 931 GB 1024 KB
Disk i No Media 0 B 0 B
Deejay 2 No Media 0 B 0 B
Disk 3 No Media 0 B 0 B
Disk 4 No Media 0 B 0 B
Disk v Online 29 GB 0 B DISKPART> select disk 5Disk 5 is at present the selected disk.
DISKPART> clean
DiskPart succeeded in cleaning the disk.
DISKPART> create partition master
DiskPart succeeded in creating the specified partition.
DISKPART> format fs=ntfs quick
100 percent completed
DiskPart successfully formatted the book.
DISKPART> agile
DiskPart marked the current partition as active.
DISKPART> exit
Leaving DiskPart…
M:\>
- Let's make the USB drive bootable. At the Command Prompt run the post-obit command.
bcdboot k:\windows /s k: /f all
Find there is a space betwixt the switch /f and the discussion all. The letter of the alphabet M in both places represents my USB drive.

- Now that the USB drive is configured let'south mount our ISO file in Windows 8. Locate the ISO file, correct-click and select Mount. By mounting the ISO file we have a new drive alphabetic character in Windows File Managing director and it essentially looks and acts exactly equally if you have inserted a DVD in a DVD ROM drive. In my example the system assigned a bulldoze letter of the alphabet 50.
- In this footstep you volition use Deployment Image Servicing and Management (DISM) tool to deploy the Windows 8 Enterprise image. DISM can be used to service a Windows image (.wim) file or a virtual hd (.vhd or .vhdx). With DISM you can mount, unmount, capture, append, delete and query .wim, .vhd and .vhdx files. The control line options used in DISM are non case sensitive. Capitalization is only used for readability. Considering DISM is congenital into Windows 8 I recommend using DISM to create a Windows To Become USB bulldoze rather than using the sometime IMAGEX tool. Follow the instructions in the screenshot below.At the Control Prompt, switch to the drive letter of the alphabet 50: where the ISO file is mounted. Change to the Sources folder by typing cd sources. There is a file called install.wim that we need. If yous blazon dir install.wim you will see it listed.
Type the following command where L: is our mounted drive alphabetic character for the ISO file and Yard: is the USB drive. The index should e'er be ane.dism /apply-image /imagefile:L:\sources\install.wim /index:1 /applydir:Grand:\
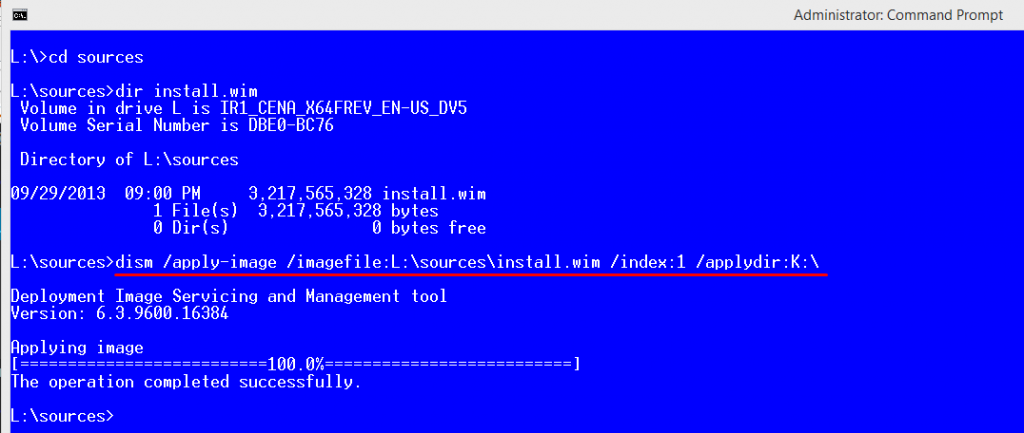 In the above command there was no need for us to apply the total path 50: \sources\install.wim considering nosotros are already in the Sources folder on drive L. I only used it so in example you are on a different drive the control will still piece of work as long as you lot use the full path for the install.wim file. On my computer it took a picayune over an hour to complete the process. Depending on your computer, RAM, CPU etc. it may take several hours but at least y'all can see the progress displayed in percent on your screen. On my computer information technology took about ninety minutes for this performance. Once the performance is complete you are done with the deployment.
Getting Windows To Become Workspace Ready for Beginning Use
Microsoft refers to the Windows To Go drive running Windows eight every bit Windows To Go Workspace. To go information technology ready for kickoff apply follow these instructions.
- Make sure your computer supports booting from a USB and if does, you lot need to ensure that the BIOS is configured to boot from a USB drive.
- To configure Windows To Go, turn off your host computer so kick off of your Windows To Become drive. It will go through the configuration options and reboot a couple of times. Afterward well-nigh 25 minutes you will encounter the screen to accept the license terms. This is the start fourth dimension that yous need to interact with the system. Here are the steps that you will need to take.
- Accept the license terms.
- Personalize the color scheme and name the PC.
- Select a wireless network or connect to a wireless network later.
- Enter the wireless network password if you opted to connect to it now.
- Select Express or Customize settings. As a best do always use custom settings.
- Enter an business relationship proper name and password.
Don't forget to encrypt your drive with BitLocker if you want to secure information on your Windows To Become drive. You run into, the entire process wasn't really difficult at all. Other than the waiting time for the image to be deployed and configuring it for start use, you just drank your coffee, tweeted a couple of times, checked out the weather report, and the next thing yous know you lot have a Windows To Become in your pocket. How absurd is that?
Windows To Go Highlights
Here are some important points to know. Some of them are from Windows To Get FAQs page.
- Windows To Go is supported by Microsoft on USB 3.0 drives that are certified for Windows To Go but will also work on not-certified USB 3.0 drives. It's only that it won't be supported past Microsoft if yous install it on a not-certified USB drive.
- Windows To Go is fully supported on either USB two.0 ports or USB 3.0 ports on PCs that are certified for Windows 7/eight/8.i.
- Microsoft officially supports Windows To Go only on Windows viii Enterprise and Windows viii.1 Enterprise. However, there are workarounds to make it work with any version of Windows 8 or Windows 8.ane.
- Windows To Go doesn't require a USB 3.0 port, it only requires a USB iii.0 bulldoze. Considering USB 3.0 drives are backwards compatible, they volition also kicking off of a USB 2.0 port just fine.
- By default Windows To Become supports all ability states except hibernation. This can be changed in local Group Policy (gpedit.msc) located at \Computer Configuration\Administrative Templates\Windows Components\Portable Operating System\.
- Windows To Go is not supported on a Mac.
- Windows To Go is non supported on a Windows RT reckoner.
- You cannot upgrade a Windows To Become USB drive. For instance, you cannot upgrade Windows viii to Windows 8.ane. You will accept to create a new prototype of Windows viii.1 on Windows To Go.
- You may demand to configure your BIOS to allow your computer to boot from a USB bulldoze. Apparently, your computer must support booting from USB drives. If you have an older computer it many not.
- When you create a Windows To Go workspace, you'll be asked if you desire to boot your PC from the USB drive automatically. You should reply Yep, otherwise you will have to go into your PC's firmware and make changes to the startup options.
- By default, hibernation is disabled in Windows To Go.
Best Practices for Using Windows To Go
Here are some of my best practices for using Windows To Go.
- Use USB 3.0 port on your computer with Windows To Go because it will be much faster than USB three.0 port.
- Don't plug your Windows To Go bulldoze in your computer while the operating system is running on the host calculator. Plough off the estimator first, plug Windows To Get bulldoze and and then restart the computer.
- Microsoft recommends that y'all don't install non-Microsoft core USB drivers on Windows To Go.
- Practise non remove Windows To Go drive if your host PC is hibernating. If yous have removed the Windows To Become drive, y'all should plug it back into the aforementioned USB port it was using earlier waking the host system from hibernation.
- If you accidentally remove the Windows To Go drive while information technology'south running, which is a bad thought, you should plug it back within 60 seconds in the verbal same port as before otherwise your host reckoner will turn off and bad things can happen to your host reckoner, Windows To Get drive, or both.
- When yous commencement your host computer to boot with Windows To Get USB drive only brand certain that it is the only removable USB bulldoze plugged into your computer.
- If you plan on using BitLocker, which I strongly encourage, so configure information technology at the beginning when at that place isn't much content on your drive.
Resources
Y'all may find the following links helpful. Although I have highlighted some of the important points from the FAQs in the Windows To Become highlights section, I strongly recommend going through the entire Windows To Go FAQs page.
- Windows To Go FAQs
- All-time Practice Recommendations for Windows To Go
- Security and Information Protection Considerations for Windows To Go
- DISM Image Direction Control-Line Options
Hope yous relish using Windows To Become. Please share your experiences by commenting on this commodity and let me know how you feel almost Windows To Go.
Copyright ©1999-2015 SeattlePro Enterprises, LLC. All rights reserved.

To Create A Windows To Go Workspace On A Usb Drive, Which Minimum Size Usb Drive Is Required?,
Source: https://www.zubairalexander.com/blog/step-by-step-instructions-for-creating-a-windows-to-go-usb-drive/
Posted by: millernoing1960.blogspot.com
0 Response to "To Create A Windows To Go Workspace On A Usb Drive, Which Minimum Size Usb Drive Is Required?"
Post a Comment