

Prime Rib Roast Cooking Time Per Pound Chart
"All I want for Christmas is some deep knowledge about cooking prime rib." I remember singing that song as a kid. Don't you? No? Really? Well, maybe you're singing it now. Perhaps you have read our posts about smoking a prime rib or perfectly roasting a prime rib for Christmas, and thought "well, shucks, those simple steps sure do sound like they'd lead to success, but what is reallygoing on in there?" Lucky you. We're going to tell you. If you want to make sure that your holiday rib roast is the very best it can be (and that's exactly what we want to help you do), you should know more than just the bare minimum about how to cook it; you should really understand it.
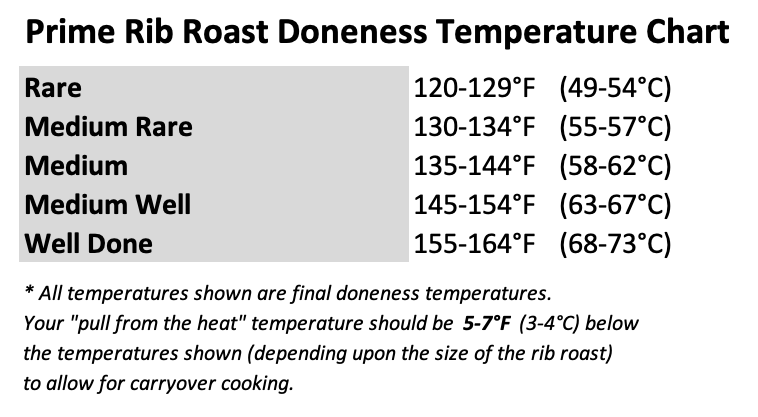
But first, for those impatient souls, right up top we want to address the topic of what temperature you should cook your prime rib to. That depends, of course, upon how you like your meat done. Here at ThermoWorks, we can't imagine spending that kind of money on a prime rib roast (they don't come cheap) and cooking it to anything but medium rare, but to each his own taste. Here is a helpful chart to help you nail your preferred doneness:
Prime Rib Doneness Temperature Chart (Not a Prime Rib Time Per Pound Chart!)
Many people look for a chart that will tell them how long to cook their prime rib per pound of roast. While we understand that instinct, it is fundamentally flawed. You see, the prime rib is basically cylindrical in shape, so heat enters the roast along its length, not just from the caps. A longer roast takes about the same time to cook as does a shorter one. As the cylinder gets longer and longer (say, in a six vs eight-bone rib roast), the change in cooking time approaches zero.
Differences in cooking time are more likely to come from the diameter of the roast than from its sheer weight or length. In the end, the best way to cook a rib roast is by temperature, not by time. But, as a general guideline to help you plan your dinner, a roast of average diameter should not take more than 2-1/2 to 3 hours of cooking time (to reach medium rare) with the method we describe below. If you want your rib roast to come out right, cook it by temp, as described in this chart.
| Preferred Doneness | Degrees F | Degrees C |
|---|---|---|
| Rare | 120-129°F | (49-54°C) |
| Medium Rare | 130-134°F | (55-57°C) |
| Medium | 135-144°F | (58-62°C) |
| Medium Well | 145-154°F | (63-67°C) |
| Well Done | 155-164°F | (68-73°C) |
**Remember that these are final doneness temperatures. Your "pull from the heat" temperature should be 5-7°F (3-4°C) below the temperatures shown (depending upon the size of the prime rib roast) to allow for carryover cooking.
Now back to our discussion of all things prime rib…
What is a Prime Rib?
A prime rib can go by other names—beef rib roast, ribeye roast, or standing rib roast (so called when it is bone-in and can be roasted without the meat touching the pan)—but regardless of what it is called, it comes from the 6th through 12th ribs of a cow, sandwiched between the chuck and the short loin. It is primarily composed of thelongissimus dorsi muscle that runs next to the spine. Because of its location high up on the back of the cow, this muscle is not well used. This lack of use means that this muscle develops to be much more tender than, say, the rear-leg muscles (the Round of beef): it is anatomically predisposed to tenderness.

Tenderness is, of course, only one of the attractive characteristics of this cut of meat. Perhaps the most notable feature of this cut is the deep, rich fat marbling. The "eye" of the rib is encircled by a ring of fat and connective tissue, outside of which lies the "lip" of the roast. Much of the whole roast is covered by a fat cap of varying thickness. It is those seams of fat that deliver rich flavor and a velvety texture, as well as keep the meat from drying out easily.
Prime Rib Roast Selection
When selecting a rib roast, make your selection based on grade, price, and need
Picking out a rib roast at the store is a big deal. You want the best roast you can get in your price range, but you don't want to come up short at dinner. So what should you buy and how much of it should you get? Let's look first at grading and quality.
It's a little known fact, but the method of grading beef by the USDA is solely based on fat marbling. The more thoroughly marbled the beef, the higher the grade. Higher graded beef will be juicier, more tender, and more flavorful, but it will also cost significantly more.
Buy the highest grade you can on your budget. If you can afford Prime grade, go for it! But Choice is generally a good intersection of quality and affordability.
You may have heard that Prime Rib refers to a prime-grade rib roast. This isnot true—at least, not necessarily. The term "prime rib" predates the USDA meat grading system and is a reference only to the fact that it is the best part of the rib section. In fact in the USDA Food Standards and Labeling Policy Book, (pg 146), the USDA clearly states that, "PRIME RIB OF BEEF OR STANDING BEEF RIB ROAST FOR PRIME RIB: These products do not have to be derived from USDA prime grade beef" (emphasis in original).
Prime ribcan be graded USDA Prime (it will cost you!), but it can also be USDA Choice or USDA Select. "Ungraded" meat cuts are also available, but if it were my decision, I'd get a little less of the better stuff than more of the ungraded.
So how much of this delicious, pricey beef do youneed? That really depends on you and your guests, but as a general rule, figure about 1/2 pound of raw roast per person on a boneless roast, or one bone per two people on a bone-in roast.
Should I buy a boneless or bone-in prime rib roast?
Having reckoned grade, price, and guest-count, there's still one more decision you need to make before you buy your roast: whether to go boneless or bone-in.
The debate has gone on for years, with the pro-bones arguing that the bones contribute more flavor, and, if pressed, insisting that the marrow was seeping in from the bones to the meat. This has been shown by J. Kenji López-Alt , a team at Texas A&M's Meat Science Department, and Meathead Goldwyn to be untrue. The marrow in the ribs is the wrong kind for "seeping" and the bones themselves are pretty impenetrable—even to the gooey, tasty kind of marrow.
There is one way in which leaving the bone in can actually have an effect: as a heat buffer. Having a shield of bone and connective tissue on your meat can help to prevent overcooking. But if you like your roast rare to medium rare, it can actually lead to chewy, undercooked meat right near the bone.
In the end, you'll have to decide based on your preference. A standing rib roast (which can be as small as two bones or as long as the full seven) is beautiful to behold, but more difficult to carve—you will probably just cut the bones off to serve it anyway. Yes, a bone-in roast will usually be cheaper per pound, but you will be paying for bone weight, which is not directly useful to you.*
On the other hand, boneless prime rib roasts are easy to cook, easy to carve, but cost more per pound. The choice is yours, but in the ThermoWorks kitchen, we most often cook boneless roasts.
* If you choose to get a bone-in roast, we recommend having your butcher prepare it "cut and tied," with the bones cut off and tied back onto the muscle. This creates an easy carving situation while maintaining presentation and heat-buffering advantages. The bones are fun and tasty to gnaw on after dinner, or you can use them to make a beef stock.
How do I prepare a prime rib roast for cooking?
Ok, you've chosen a grade, a size, and a bone-status, and it's getting time to cook. When we cook a prime rib, we're looking for a uniform, edge-to-edge color and a delicious, flavorful crust. In order to get that kind of perfection, we need to take thermal control of the situation: we'll want to sear it and roast it with precision and care, and we're going to start with some string.
How to Tie Your Prime Rib
Tying a rib roast is very important. If you don't know how to do it (YouTube will gladly teach you), have your butcher tie it for you. By tying the roast, you can create a more uniform shape and density along its length. This translates directly into more even cooking, with less chance of a gray ring around the inside edge of your holiday-table centerpiece. The tying also evens out the surface, allowing for better browning in the sear phase, and will result in a better looking finished product that is easier to slice.
To pre-rest or not to pre-rest
There is sadly no consensus on the appropriateness of a counter-rest phase in preparing a prime rib roast. For example, America's Test Kitchen features three different methods for preparing a prime rib for roasting—1) salted in the refrigerator for 24 hours, 2) salted one hour in the refrigerator followed by pre-resting for two hours the counter, and 3) just pre-resting for two hours on the counter. Other experts go straight to the oven without a pre-rest. While others suggest putting the prime rib in the freezer before searing, to chill the meat. All this ambiguity can be perplexing.
We wanted to determinethe effects of various thermal preparations prior to searing and cooking in a boneless prime rib roast. We roasted 5 boneless prime rib roasts, carefully monitoring the thermal state of each roast through our various stages of preparation, cooking, and resting. For two of the prime ribs, we rested the meat on the counter prior to searing and roasting. For three prime ribs, we placed the meat in the freezer prior to searing and roasting. We were curious to see which of these methods produced a finished result with the most desirable attributes of a finished prime rib—a crispy outer crust but with no discernible gray ring between the seared crust and the rosy pink meat inside!
➤ A Prime Rib Roast Method
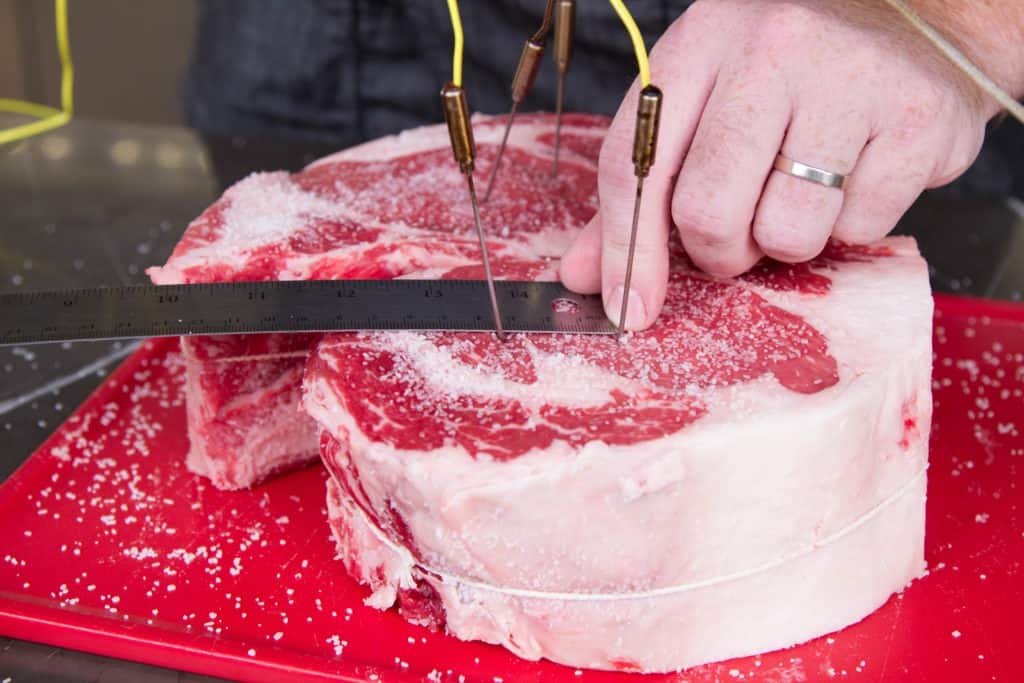
We started with four boneless prime rib roasts of roughly equal size and mass (each about three pounds), each with the same initial thermal conditions—coming straight from our refrigerator at ~38°F (3°C). We salted each of them (to flavor them and draw out excess surface moisture and encourage a better sear later on) and prepared our thermometers.
We fitted each prime rib with severalType K Thermocouple Mini Needle Probes (each 3.35-inch long), and connected these to a pair of ThermaData™ Thermocouple Logger KTC's. These thermocouple-type thermometers are exceptionally accurate, and the loggers keep track of the data over time—perfect for watching the thermal situation in a roast. We placed each probe's sensor at the middle depth (half-way through) each roast. One probe was in the centermost part of the roast, one ~0.5 cm from the outside edge, and the other evenly spaced between them.
➤ Pre-sear prime rib treatment
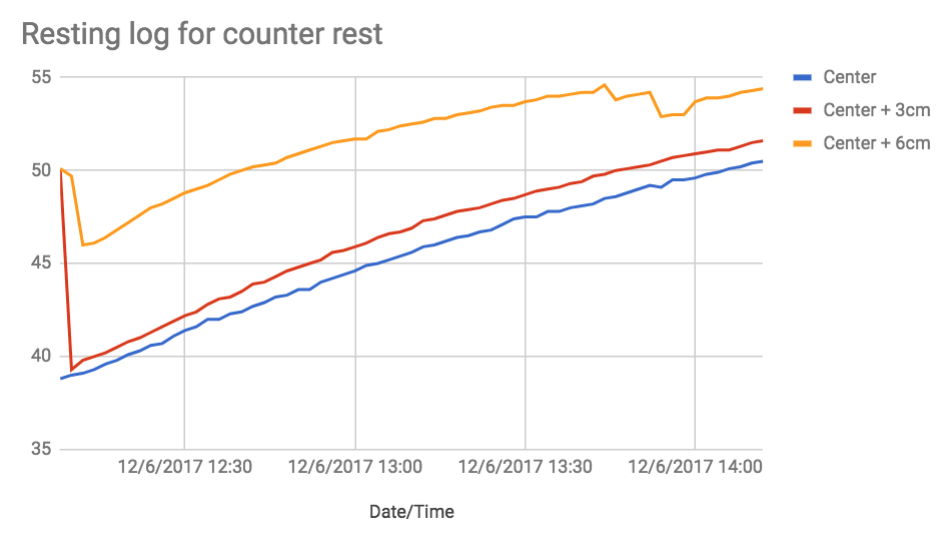
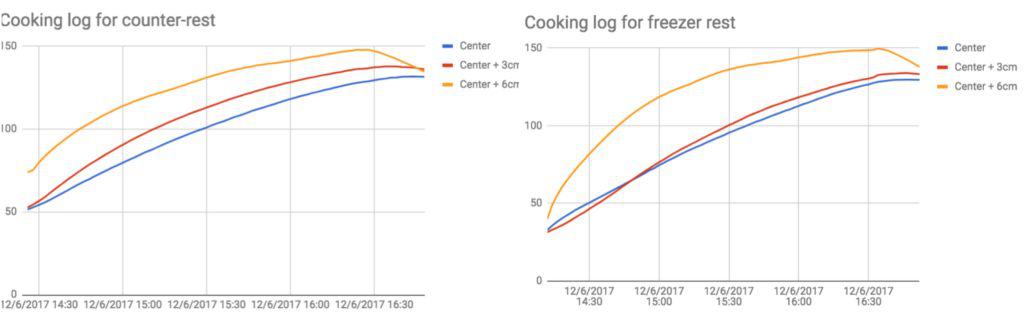
We placed the first two roasts on the countertop, uncovered, in a room-temperature kitchen (~68°F [20°C]). Our goal was to let it sit for 2 hours or until the centermost probe temperature reached 50°F (10°C), whichever time was less. You can see how the temperature of the meat was affected by this counter rest in the chart below. The initial drop was due to needle re-arranging, but you can see that the center of the meat rose steadily from the initial38°F (3°C) to the50°F (10°C) that we wanted. It took the whole two hours, and these were only a three-pound roasts. (A larger roast will need 2-3 hours to come up to closer to room temperature like this.)
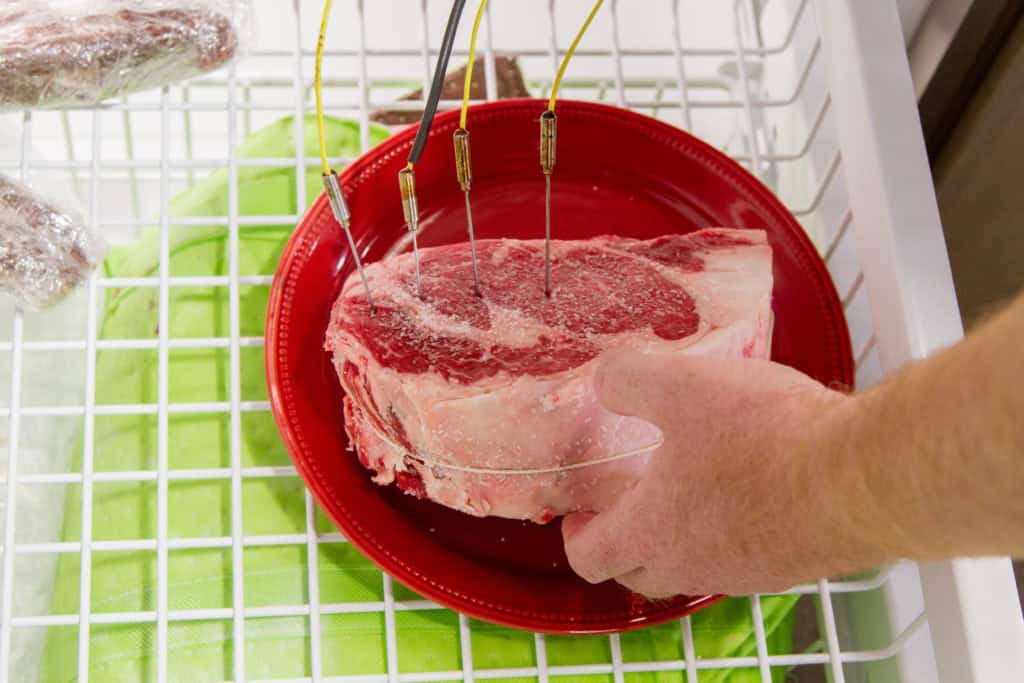
The other two roasts were placed in the freezer (~2°F [-17°C]), unwrapped and uncovered, until the outermost probe reached 29.5 °F (-1°C), a temperature we chose because we wanted the outside of the meat to start to get stiff and start to freeze before being seared. If we were going to protect the outside of the roast from graying, it stood to reason that chilling the region where the graying was most likely to happen just before introducing the cut to the intense heat of the searing pan was a good move.
Take a look at how the freezer rest turned out in the chart below.
The outer most edge (Center + 9cm) arrived at the low temperature we wanted in roughly the same two hours it took the counter-rest roast to come up to temperature.
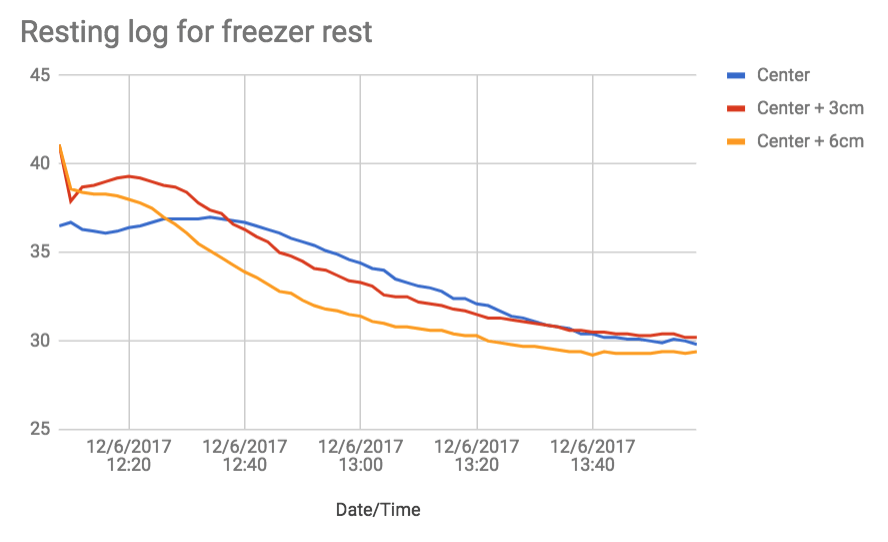
Note, as well, that the three different temperature readings were closer together in the freezer roasts than in the room temperature roasts—meaning that there was less of a gradient differential when the meat was first introduced to heat—but that the cooler temperatures of the freezer roasts would have farther to go to arrive at our final doneness temperature of 130°F (54°C), or perfect medium rare.
➤ Searing your prime rib roast
Searing is an important part of roasting a prime rib. Searing the roast first will kill the surface bacteria, which is a nice touch, especially when you are roasting at lower temperatures. However, from a culinary standpoint, it is also very important. We get a bit of a nice crisp-meat crust from the sear, but more importantly, we create a coating of Maillard-reaction browning all over the roast. This natural flavor enhancement will baste the during cooking with tastier juices than if we had put it in the oven raw.
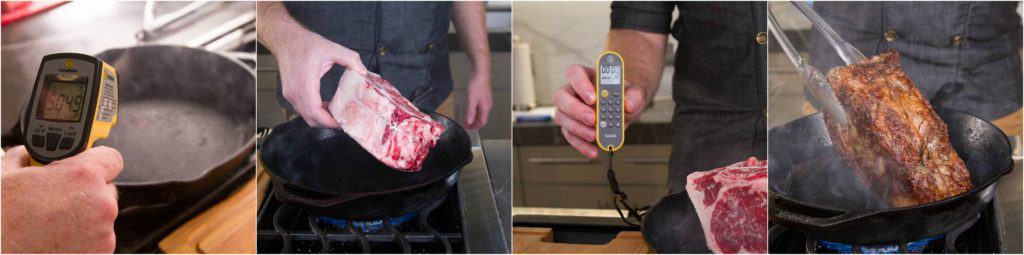
As the roasts neared their target pre-sear temperatures, we preheated our cast iron skillet to 500°F (260°C) as measured with an Industrial IR with Circle Laser (IRK-2) infrared thermometer. The probes were removed from the roasts immediately preceding searing so that we could sear all sides of the roast. Each surface of each roast was seared for 2.5 minutes, resulting in a "nicely browned" exterior.
➤ Cooking your prime rib
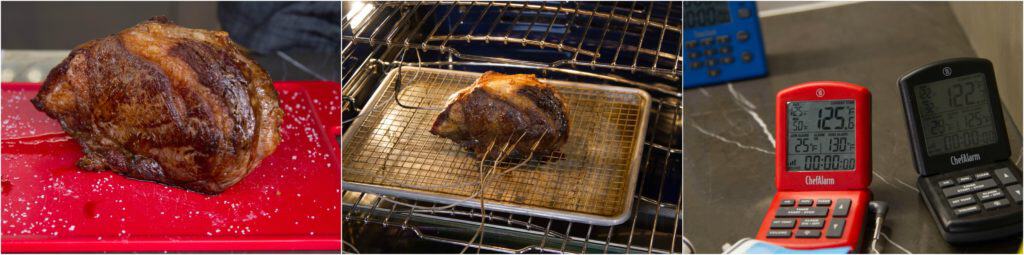
We next re-placed our probes in each of the roasts and placed each in a well-preheated 225°F (107°C) oven. We also added a probe attached to a ChefAlarm® leave-in thermometer to simulate the controls normally used in a well-equipped kitchen. Lastly, we started a TimeStack® timer in "count-up" mode (by simply pressing the Start/Stop button) so we could keep track of how long each roast took to cook, to see if there might be any significant difference in cook times for each method.
We cooked each prime rib to 125°F (52°C) so that approximately 5°F (2°C) of carryover cooking would get us to our finish temperature of130°F (54°C) for a perfect medium rare. (If you like your meat more cooked, increase your pull temperature by 5–10°F [3–6°C]. This cut of meat really is not going to be as good above medium, however, so if your guests want darker meat, I recommend cooking to medium at most and then cooking individual portions further in a hot skillet or on a grill. Given that, people often ask for a prime rib temperature chart. Rib temps are the same as other beef temps, so that chart can help.)
Below are charts logging the temperature through the roasting process, including a half hour resting period after roasting.
This data tells us lots of interesting things. First, we can see the thermal gradients in the roast. as expected, the roast cooks from the outside in, creating layers of temperature that circle like tree rings going down into the meat.
Next, both roasts had maximum exterior temperatures that crested near 150°F (66°C) right when we were taking the roast out to rest. This is scraping just over the temperature where meat starts to turn gray—140°F (60°C)—but we see that 3 cm below the surface, we never really pass that mark critical temperature. If we have any gray ring, it will be because the meat that turned gray will have spent too much time above that inflection point.
The majority of the meat never goes above 130°F (54°C), which is the temperature at which protein fibers in meat begin to tighten and expel water. By keeping the temperature below this point, we've avoided the toughness that follows the constriction of the muscle fibers.
Another key to a good roast can also be found in this data: the length of time spent in the low-temperature zones. Meat naturally contains enzymes that break proteins down and create a more tender product. That's what happens in the aging process. Those enzymes are more active at higher temperatures, up to a certain point. Calpains drop off around 105°F (40°C) and cathepsins stop working at about 122°F (50°C). the longer we can hover in a higher rangebelow these temperatures, the more tender our roast will be. (See Harold McGee's On Food and Cooking, pg 144.)
- The counter-rested roast spent just 24 minutes within the range of double enzyme activity, and 113 minutes with any activity at all.
- The freezer-rested roast spent 35 minutes in the double-enzyme zone, maintaining a single enzyme action for the entire length of the cook—137 minutes.
With 11 extra minutes of double enzymes and 24 extra minutes of single enzyme action, the freezer-rested roast will have a chemical advantage in tenderness over the counter-rested roast.
As has been the case with every step thus far in our cooking process, the world of food is filled with contradictory methods for actuallycooking a prime rib. Some say to blast the rib in a 400–500°F (204–260°C) oven and then shut the heat off for an undetermined amount of time. Others say to put it in an oven that can best be described as "warm" for 12-18 hours. For reasons that can be seen in our data, we maintain that a low oven (200-225°F [93–107°C]) with constant temperature monitoring is the best method. Because of this low-and-slow methodology, prime rib lends itself very nicely to being cooked in a smoker.
➤ Resting your prime rib
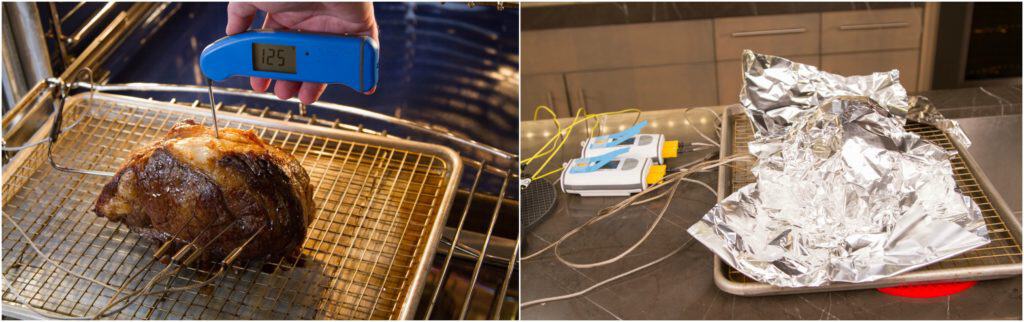
Once the roasts reached 125°F (52°C), we verified their temperatures with a Thermapen® ONE and rmoved them from the oven, covering them with aluminum foil to rest. All meats should be rested before cutting and serving them. The rest period allows for temperature gradients in the meat to even out, slowly cooling the exterior while the interior meat continues to rise in temperature. It also allows the muscle fibers to relax, reabsorbing the juices that they may have squeezed out in cooking. Our data above shows that during the rest period for both pre-cooking methods our exterior temperature dropped while the interior temperatures continued to rise slightly. Perfect.
➤ Proof in the pudding
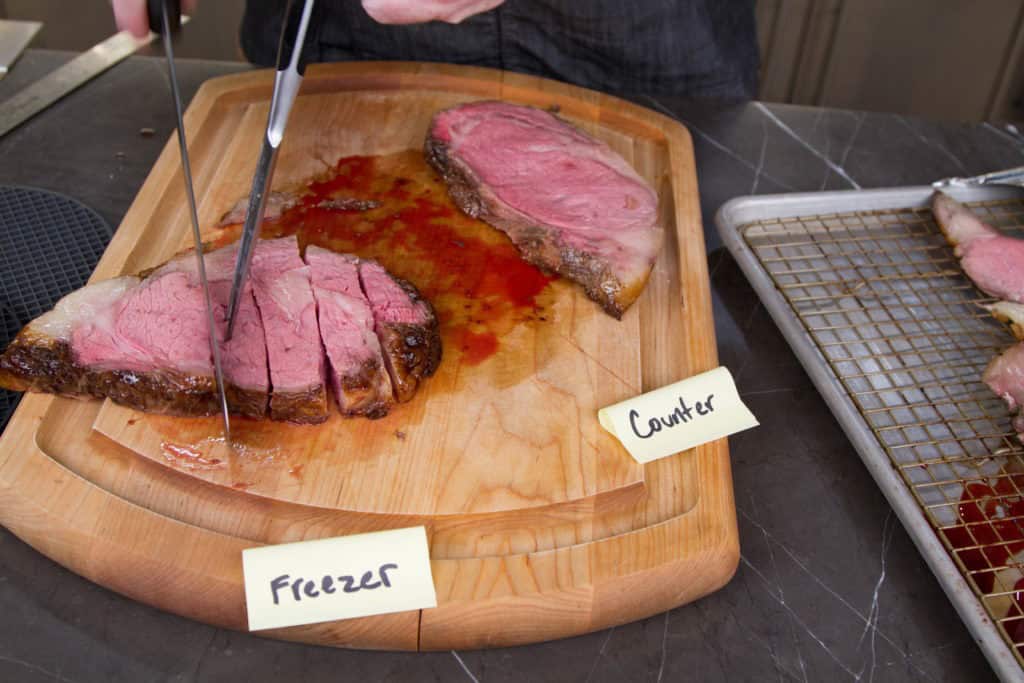
Once the ribs had rested, we sliced them open to take a look, and the differences were slight. Both of them were amazing. They were an even rosy pink across the vast majority of the meat. I had to get a ruler out to measure the gray rings—or what could pass for such. The counter-sit method had a gray ring that was roughly 3mm wide. It was hard to find. But thefreezer-sit method was even better. It had a scant 1mm gray ring. They were gorgeous.
When we performed taste tests on the roasts, the difference was slight but landed in favor of the heightened tenderness of the freezer method.
➤ What about a crust on prime rib?
One of the appealing features of a prime rib is the salty, seasoned, beefy outer layer. Many methods include an instruction to reverse sear (sear after cooking) your roast to increase the crispiness. We wanted to keep the flavor and food safety advantages of pre-searing but also wanted to see if a final sear could give us just one little of extra enjoyment. For our fifth rib roast, we followed the freezer method for pre-cooking. We set our ChefAlarm to 115°F (46.1°C) so that we would be able to move the meat to a hot oven with thermal room to spare. As the roast approached pull temp, we preheated a second oven to 500°F (260°C).
When the alarm sounded, we reset it to 120°F (49°C) and moved the roast to the hot oven. The roast started to sizzle and sing almost immediately. It became steadily more brown and crisp on the outside. When we reached the next alarm point (set lower to account for the increased oven heat that would drive more carryover cooking), we removed the roast, let it rest, cut into it, and were disappointed to find a very noticeable gray ring, up to 1″ thick. In the end, the 2mm thick crust that we got from the final sear was not worth the vast swaths of rosy pink meat that were lost.
We recommend a low, slow cook preceded by a good sear. Whatever crust you may get from the final sear is just not worth the risk to the rest of this exquisite cut of meat. And with the freezer method, you can get a harder sear without worrying about a gray ring from the beginning.
➤ Seasoning your prime rib roast
Before we conclude, I'd like to make a note about seasoning your rib roast. You paid a lot for this roast. Let it shine. Prime rib doesn't need a lot to dress it up, and will, in fact, do swimmingly with nothing but salt and pepper. Some people are tempted (especially if they are cooking their rib roast in a smoker) to put all kinds of powerful spice rubs on their rib roast. If you feel so inclined, that is your choice, though this meat really shines with classic flavors. That being said, if you really want to dress it up and stay within a classic flavor palette, I recommend making a wet-rub of 3 cloves minced garlic, the minced leaves of 2 fresh rosemary sprigs, 1 teaspoon black pepper, 1.5 tablespoons dijon mustard, and 1/4 cup olive oil. Apply it after your sear and you will be hailed as a luminary of the kitchen.
Prime Rib Testing Conclusions
Having considered thermal barriers, enzymatic actions, pre-and post searing, and other factors, we can say that the method of first salting and then partially freezing your prime rib, searing it in cast iron, and then cooking it in a 225°F (107°C) oven until the center reaches 125°F (52°C) and then letting it rest is the path to a perfect prime rib roast. It takes about 1/2 hour longer than the countertop method, and 2.5 hours longer than going straight from the refrigerator, but the difference is the difference betweenalmost perfect andperfect. The slight bit of extra give in each bite, the difference between a 3mm and 1mm ring, the extra tenderness from the enzymatic aging—these differences are what separate a great rib roast from anexceptional prime rib. Thermal knowledge about your food gives you control over its production, and control over the outcome. So take control of your holiday dinner and make a roast your family will still be talking about next year.
And, just in case you prefer a different doneness temperature, here is that prime rib doneness temperature chart again as a downloadable image…
Description
Perfect prime rib is all about temperature control. Here's how to get it just right.
- 1 prime rib, size determined by need
- Kosher salt
- Freshly ground black pepper
- Trim your rib how you like it best.
- Generously salt the roast, insert a thermometer probe near the edge of the roast, set the low-temp alarm of your ChefAlarm for 30°F (-1°C) and place the roast in the freezer.
- Meanwhile, preheat your oven to 225°F (107°C).
- When the low-temp alarm sounds, remove your roast from the freezer.
- Heat a heavy skillet (cast iron is preferred here) over high heat.
- Sear the roast well on all sides in the skillet.
- Season with pepper and/or any other seasonings you like.
- Place the roast on a rack set into a rimmed baking sheet. Insert a probe into the very center and set the high-temp alarm for 125°F (52°C).
- Cook the roast in the oven until the high-temp alarm sounds. Verify that there are no lower temperatures in the meat with your Thermapen Mk4.
- Remove the meat from your oven and let it rest for 30 minutes, lightly tented with foil.
- Carve and serve!
Keywords: Prime Rib Roast, Christmas Roast
Products Used:
References
Harold McGee, On Food and Cooking
Meathead Goldwyn, AmazingRibs.com
J. Kenji López-Alt, SeriousEats.com,The Food Lab
U.S. Department of Agriculture, USDA Food Standards and Labeling Policy Book

Prime Rib Roast Cooking Time Per Pound Chart
Source: https://blog.thermoworks.com/beef/science-of-perfect-prime-rib-roast/
Posted by: millernoing1960.blogspot.com
0 Response to "Prime Rib Roast Cooking Time Per Pound Chart"
Post a Comment